Docent: Brandi Hennessy
Grade: 2nd
Date: March 2016
Medium: Paint, White Paper, Green large matting paper,
sponge dot brushes
Reason for Lesson:
We are talking about space…white space/negative space, and creating art by
making different use of our space. Our art project is going to use both
positive space, and negative space to create a dot out of smaller dots.
Label: Space
Prep Time:
Materials will be in the 2nd grade box. 8 ½ x 8 ½ paper with a
circle template on it. 8 ½ x 8 ½ white cardstock paper for the students to do
their 2 art projects on.
Preparation prior to
lesson: gathering supplies, printing circle template (I did it on a
not-white paper), cutting 8 ½ x 8 ½ squares of white paper for the actual
painting (2 per student)
Class Time: 60
minutes
Materials: Circle
template, white paper squares, matting paper (large), paint, sponge dot brushes
Step by Step
Instructions:
1.
Read The Dot by Peter H Reynolds (It will be in
the 2nd grade art box)
2.
Talk about negative space and positive space. We
are going to create two pieces of dot art—one using positive space and one
using negative space. Show the example:
See image dot (1)
3.
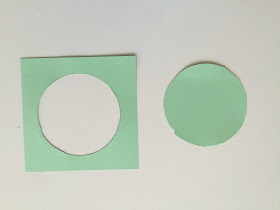
Hand out the colored square with a circle on it.
Students need to cut out the circle without cutting through/ruining the outside
template…we are using both pieces of the circle template as stencils.
See image dot (2) and image dot
(3)
4.
Hand out 2 white squares ( 8 ½ x 8 ½) to each
student. They will carefully tape the circle to the center of one of the
squares. They will carefully tape the negative circle template to their other
piece of paper.
See image dot (4)…note that you are only using two small
pieces of tape per page, and barely have it on the white paper.
5.
Now comes the painting of dots on the two pages
in the stencil area. I think the easiest way to handle the paint and sponge
situation (without having to constantly wash brushes) is to choose the 4 colors
you are using, and give each student a cup (or egg crate pieces, whatever) with
one color and one brush…for instance, create 5 cups of red, 5 cups of blue, 5
cups of green, 5 cups of yellow and alternate them between students. Have
students create dots with their one color, and then say “switch” and have them
pass their paint to the right so everyone has a new color. If you switch 4
times, each student will have a chance to use each color, and they are passing
the color AND the sponge so they wont have to wash their sponges until the very
end.
See image dot (6)
6.
Once their two pages are done, remove the circle
templates and then mat their two squares side by side on their larger colored
paper. Be sure their names are on the back!!
Final image dot (1)
Reference:
Here is some information on the book we are using:


No comments:
Post a Comment