Supplies:
Chalk Pastels (various warm and cool colors)
White Oil Pastels
White Cardstock Paper 8.5x11 Black Glitter Paper
Black Acrylic Paint and Paper Plates (for palettes)
Fan and Flat Brushes
Baby Wipes
If you've been at Prairie View since Kindergarten, this will be our fifth Northern Lights project! But for those of you just joining us, let's review The Science and Beauty of Auroras!
Here is our project today:
Now that we know the science, let's take one more look at the colors and how the lights dance and move as we get ready for our art project!
Instructions:
1. Hand out Glitter Paper.
2. Add a thick white line to the bottom of the paper using a white oil pastel (about a 1/4 of the way from the bottom of the Glitter Paper). We want to leave lots of "sky" above for our Northern Lights.
3. Next we are going to work on our Northern Lights. Take a look at this video for the technique before you begin. (Turn off video at 2:51 mark as we will be doing something different with our landscapes once the Northern Lights are completed).
4. Tear white cardstock horizontally.
5. Lay down the cardstock and add warm chalk pastel colors to the top along the torn side (only on the white - not the black glitter paper).
6. Once all of the colors have been added to the torn side (see example above), place the cardstock near the top of the black glitter paper and using your finger, swipe up to transfer the chalk pastel to the black glitter paper like in the video. See how the colors are blending?
7. Tear off another strip of white cardstock in a different pattern and now use cool colors. Remember that we want our Northern Lights to move across the paper!
8. Alternate warm and cool colors with the remaining cardstock - moving the cardstock around to create different directions. Notice that some are close together and others are spaced apart. Make sure to take a look at your spacing and plan so that you are able to get all four strips onto the skyline before you reach the "snow."
9. Once you have your Northern Lights completed, fill in the bottom with the rest of your "snow" (if not already completed).
10. Add a couple of trees (2-3 only) to the landscape. Watch this video (and technique) that we have used before:
11. Set aside to dry. Once dry, feel free to add a little bit of white oil pastel to the tips of your trees for "snow."
Supplies:
Watercolor Paper
Pencils
White Oil Pastel
Liquid Watercolor - Warm Colors (Red, Pink, Yellow, Orange)
Liquid Watercolor - Cool Colors (Turquoise, Blue, Purple, Green)
Paint Brushes
Salt Shakers with Salt
Instructions:
Watch this video on jellyfish, paying particular attention to their heads and tentacles:
Pass out the papers, having the students write their names on the back in pencil. We will first complete a guided draw of the jellyfish (have the students lightly draw with their pencils). They can draw one large one or no more than three smaller ones here and there on their papers. We will then paint them using warm and cool colors.
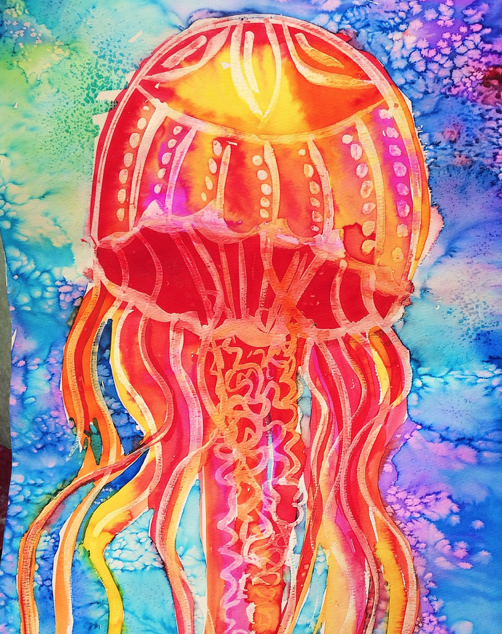
1. Draw the main body of the jellyfish (it looks like a turtle's shell):
2. Draw the first two tentacles:
3. Draw the third tentacle:
4. Add some detail to the head:
5. Add more tentacles:
6. Complete the jellyfish by finishing the last tentacle:
7. Once you are done with your jellyfish drawing, trace over the pencil lines with your white oil pastel - remember to trace heavily (press as hard as you can). Add more details to the jellyfish's head (dots, lines, designs) and legs - see below for a sample. Note: Keep the tentacles at the bottom very simple - this will make it easier to paint later. But definitely add details to your jellyfish's head!
8. Once you are done tracing with your white oil pastel, we will begin painting. Using your brush, paint the jellyfish with water first and THEN add the paint using the WARM colors. Do not overwork the colors too much - just move them around and let the water do most of the work. Docents: A couple of drops of the different colors should do it - do not over-saturate. Artists: Try not to go outside the lines of your jellyfish.
9. Once the body of the jellyfish has been painted, carefully add water around the outside background of the jellyfish (the "water"). Again, add a couple of drops of the different colors but DON'T blend the colors too much - we want to see every color (not a muddy mess)! Take a look at the sample above.
10. Working quickly, add salt to the background and let dry (this might need to be done one table at a time due to the number of shakers). The watercolor paper soaks up water quickly so have the artists paint and shake as they go!
11. Once complete dry, carefully remove the salt.
12. If time allows, you can watch this additional video on these amazing creatures!
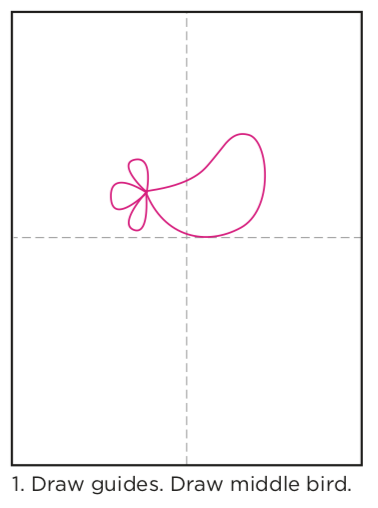
Materials: Stacked Birds PDF Tutorial
Multimedia paper (I used white cardstock)
Pencils
Black Sharpie marker
Crayons, Markers
Water
Paintbrushes
Turquoise liquid watercolor paint
1. Hand out paper and have students put their name on the back. Have the students gently crease their paper to act as a guide (don't fold entirely).
2. Conduct a guided draw with pencil for the students based on the Stacked Birds PDF Tutorial (linked above and posted below).
3. Go over all pencil lines with a Sharpie.
4. Use crayons to add details to the birds - decorations, patterns, etc.
4. Use Crayola markers to color in the birds, grass and flower.
5. Using a paint brush and clean water, color over each bird, grass and flower.
6. Finish the project with turquoise liquid watercolor paint (a few drops on each page and then have students use lots of water to move the paint around their birds, flower and grass).