Wednesday, November 9, 2011

Variety... James Rizzi Style


Medium: Watercolor

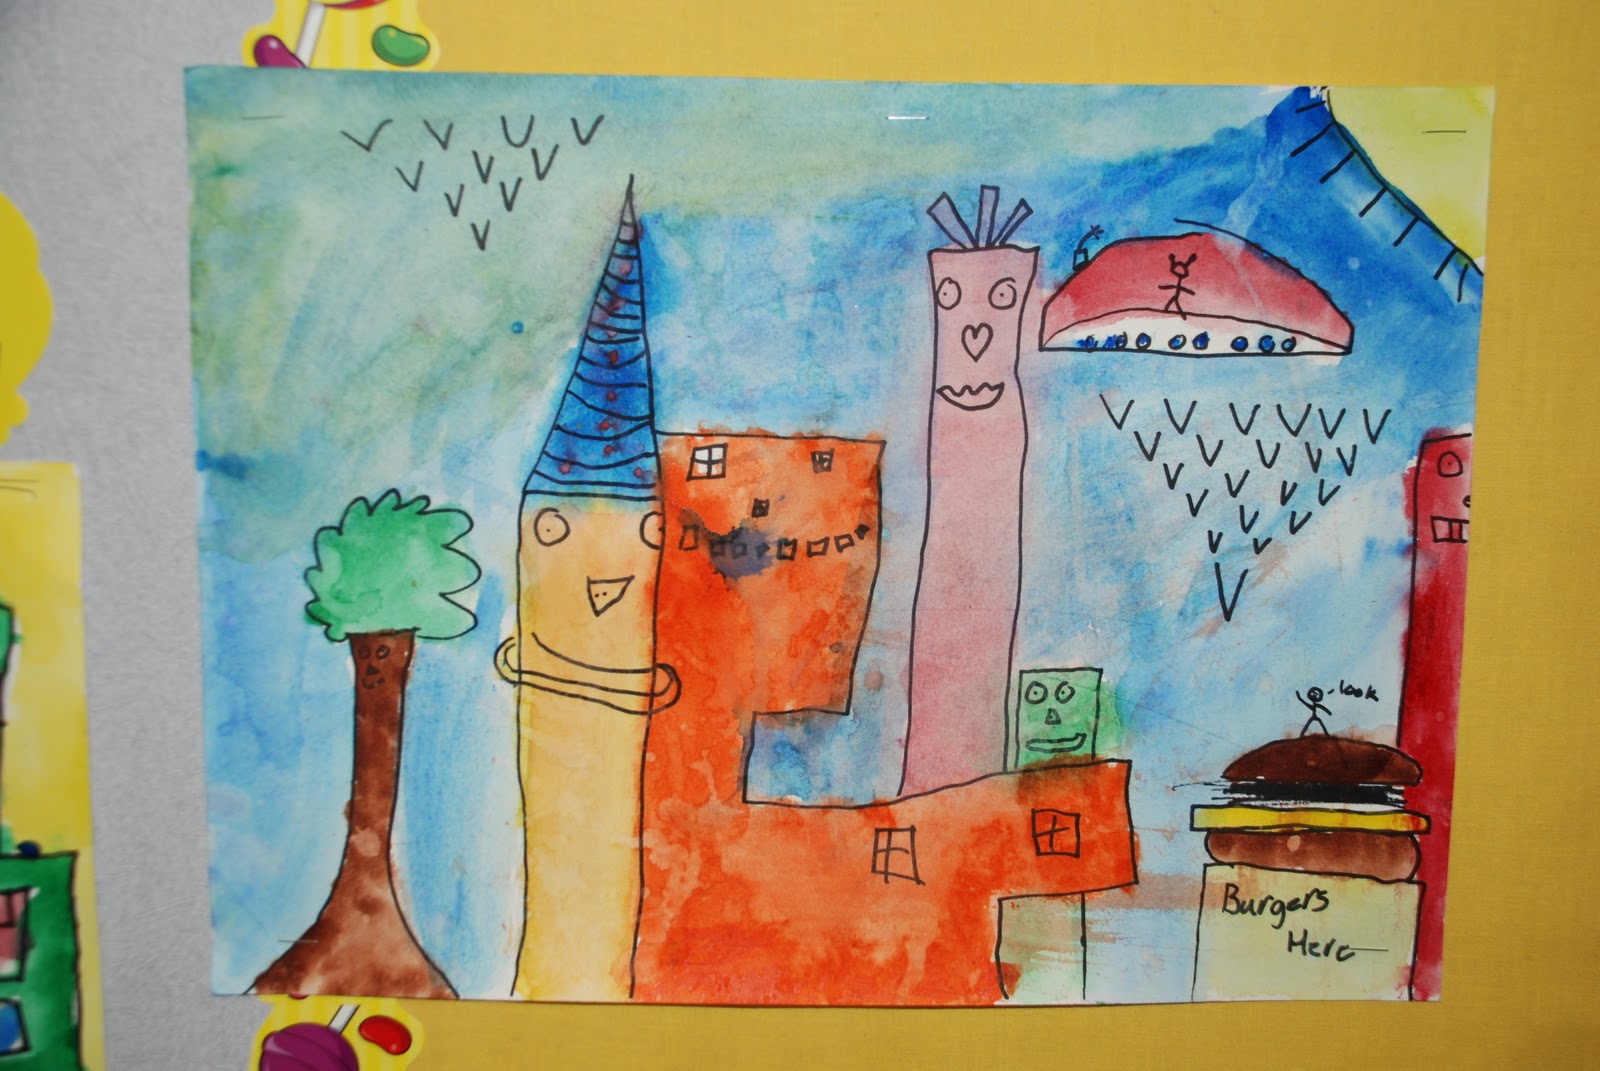
Reason for the Lesson: To discover the use of shape, line, color and space and to explore a 'living' artist and create their own artwork inspired by the artist James Rizzi.

Prep Time: 30 minutes or more to research information on the artist James Rizzi.  There are websites on James Rizzi and other teachers who have also taught James Rizzi concepts. 
Preparation prior to class:  Become familiar with James Rizzi the artist. Explore his work and develop a power point show to showcase samples of his artwork. Class Time:  2 hours - you will want to break this lesson down into two sessions could take some students longer to complete than others.

Materials: 12x18 water color paper, black sharpies, water color paint, small brushes and large brushes. 

Instructions to Lead Lesson:  Open with a discussion about the artists.  Here is information I used to introduce James Rizzi to the students.  
  • James Rizzi was born in 1950 in Brooklyn NY. Rizzi could be the most famous living artist.
  • He studied art in Florida (Gainesville), where he started experimenting with printing, painting and sculpting.
  • Know as ‘the guy who draws the buildings with faces’
  • Sometimes he is known as the ‘guy who draws those birds'
  • James Rizzi has created hundreds of prints, paintings and drawings AND he has put his art on lots of other 3D things like---buildings, sculptures, airplanes, cars the German government have used his art on stamps.
  • Rizzi’s work often shows his birthplace New York. His paintings look sometimes childishly naive, with the bright colors and fun.
  • In the art magazines and books Rizzi is often described as "Urban Primitive Artist '. Rizzi himself says he is influenced by Picasso, Klee and Dubuffet.
  • People who collect his work are fans and they flock around him like he is a rock star.
Show some paintings of Rizzi and discuss the characteristics of his art.
  • bright colors
  • no gradations within colors
  • everything is outlined with a black marker
  • houses have human faces/characteristics the artwork is full and busy 
  • background is full too
Students begin by drawing a house in Rizzi style, a house with human characteristics like clocks, faces limbs, eyes etc. It must be a house, that means students must not draw a square human being!

This can be done by drawing basic elements of a house in any case, like windows, doors etc.

Color the house with watercolor on water color paper. Outline the details with black fine marker. Cut the house and outline it with a black marker.

Draw things in the air: stars, a moon, globe, hot air balloon, ufo's etc. Look carefully at Rizzi's paintings to discover what he has made.

To make a group work, every student has to draw one house at least.

Credit: Deep Space Sparkle


Tuesday, October 25, 2011

Chagall and Surrealism


(sample artwork  of Chagall)


Marc Chagall and Surrealism 
Medium: Oil Pastels

Reason for Lesson: To understand  the use of color and shape and explore the artist Marc Chagall and Surrealism. 

  • Marc Chagall was born in Russia in 1887.  He was the oldest son in a family of nine children. 
  • He loved thinking about his childhood and let his memories guide his artwork.  He enjoyed painting pictures of the countryside near his childhood home as well as pictures of his dear family and friends.
  • He painted with bright, beautiful colors.  He liked to make his pictures have a dreamlike quality.  Many times, Chagall included upside-down and floating people.
  • Chagall loved the circus and painted many pieces showcasing the circus.
  • Chagall preferred not to explain his works in depth so many of them are quite mysterious.
  • A few things many do not know about Chagall:
    • He has designed beautiful stained glass windows that I’ve had the opportunity to see in Israel.  He designed the ceiling of the Paris Opera House.  He designed costumes and stage sets for the New York Opera’s production of Mozart’s Magic Flute.  
    • Chagall is know for his imaginative style in which recognizable objects are found in unusual positions, often floating through space. 


Note: During his earlier years his range was limited by his emphasis on form and his pictures never gave the impression of painted drawings. He adds, "The colors are a living, integral part of the picture and are never passively flat, or banal like an afterthought. They sculpt and animate the volume of the shapes... they indulge in flights of fancy and invention which add new perspectives and graduated, blended tones... His colors do not even attempt to imitate nature but rather to suggest movements, planes and rhythms."
Chagall is unrivaled in this ability to give a vivid impression of explosive movement with the simplest use of colors..." Throughout his life his colors created a "vibrant atmosphere" which was based on "his own personal vision."His paintings would later sell for very great prices. In October 2010, for example, his painting "Bestiaire et Musique," depicting a bride and a fiddler floating in a night sky amid circus performers and animals, "was the star lot" at an auction in Hong Kong. When it sold for $4.1 million, it became the most expensive contemporary Western painting ever sold in Asia.

Source: Wikipedia


Prep Time:  About 30-minutes to 1-hour to review content of lesson, and Artist Profile information.

Classroom Time:  2 hours class time

Materials:  8X10 black paper, Oil Pastels, Glue Sticks and paper towels.

Preparation:  Review/edit lesson plan, Collect materials, Create samples and display material

    Instructions for Leading Lesson
    Review with class aspects about Marc Chagall, and the characteristic of Surrealism (see  information below).  Like Chagall, you will be creating a brightly colored piece of art using the style of surrealism.  We will be focusing our art on winter.

    Step 1: Brainstorm:  Let’s think of all the things that remind us of winter (list on white board).

    Step 2: Visualization/Imagination:  Now, pick one, two or three things off of our list or something else that reminds you of winter.  Close your eyes for a minute.  See what you’ve chosen in your mind.  See it floating or upside down.  Have fun with it.  Use your imagination.

    Step 3: Drawing:
      • Using a pencil, sketch your drawing onto the black paper.
      • You can turn your paper to the right or left to draw some of your objects.
      • You will want to draw big objects so that you can color them in with oil pastels.  
      • Tip:  Oil pastels will get on your hands and easily smear.  You can create a rubbed look by using a paper towel and smearing your color(s).
      • After you have completed your sketch, use the oil pastels to color it in trying to color as much of your paper as possible.  
      • You can use some glue stick first, in a few areas.  Then color over the glue with the oil pastel to create a shiny look.
      • Once you are done, color in the background.
      • As always, sign your art with your special signature.
    Step 4, Title Your Art!!:  Be creative and come up with a title for your art.  On a piece of paper, write your name and the name of your art.

    Surrealism
    • If something is surreal, it is sort of dreamlike.  It’s not exactly how it is in real life.
    • Use your imagination.
    • The art is not what you expect to see.
    • If you distort something in your art, you add emphasis to your art.  To distort something means to change the shape to something almost silly… something that is not how it normally is.
    • Many people can define art differently. Art is subjective and is influenced by a person’s   perspective, feelings, beliefs, desires or personal experience.
    • With surrealist art, the artist is telling you something about them or something about what has happened to them. They arenʼt just giving you something to look at they are also telling you a story, a visual story.
    • The artist may have his/her own interpretation on what you think he wants you to see. Even though the piece has a title it may not make sense to the viewer, but the artists  wouldn’t have it any other way.
    • If you change one small piece of your art you can create a whole new piece of art.
    • The best part about surrealism art is that artists use many bright colors to make you feel differently when you view each object in the piece. They may make one object darker and the other light to draw your eye to the darker object. Maybe because that object is more important to the artist.
    • When surrealist became famous, many critics were skeptical of this oddly bright and crazy art work. Another very famous and favorite surrealist artist is Salvador Dali, he was thought to be a little mad at the time, but his response was “There is only one difference between a madman and me. I am not mad”
    • Using a dream analysis, they emphasized that "one could combine inside the same frame, elements not normally found together to produce startling effects. The more the relationship between the two objects are placed side by side the art has stronger images which give the piece great emotional power and a poetic reality. Much of surrealism is using your imagination and your unconscious mind, think out side the box.


    Friday, October 21, 2011

    ArtaBaloo Supply Room Inventory List

    If you are creating a supply room at your school, or are part of our program, the following inventory list may be helpful to get your started.  Are if you were wondering what is available for immediate use...here you go!:

    • Bristol Paper
    • Watercolor Paper 
    • Variety of Colored Tempera Paint
    • Construction Paper of all colors (located in School Workroom)
    • Variety of Colored Butcher Paper (located in School Workroom)
    • Oil Pastels
    • Chalk Pastels
    • Drawing Chalk
    • Color Pencils
    • Water Color Markers
    • Sponges
    • Foam Brushes
    • Paint Brush - Small, Medium, Large
    • Water Dishes, and water syringes - for easy water filling.
    • Black Ink Pads
    • Pipe Cleaners (green and small amounts of others)
    • Tissue Paper
    • Permanent Color Markers
    • Liquid Water Color Paint
    • Dixie Cups 
    • Black Sharpies
    • Charcoal
    • Water Color Paints Strips of Eight Colors
    • Mirrors (great for Self Portrait assignments)
    Since budgets are tight at our school, we ask docents to use Water Color paper sparingly, meaning don't use on every single class project.   It is the most expensive product on hand and should be saved for special projects.  Leadership suggests is to use it only once per classroom per year.

    When Docents have completed their lesson, putting materials back is so important so that the next docent will be able to locate materials quickly.  And please, please keep supplies as clean as possible.  Picking up of jar that is dirty with left over paint if not a treat for anyone...thank you :)

    Have a great day creating something artfully!!

    Monday, October 17, 2011

    26 Reasons Why Art is Good for Kids

    1. Art develops both sides of the brain.
    2. Children who make art read better and do better in math and science.
    3. Allows children to express themselves and learn who they are as individuals.
    4. Art builds self-esteem and is empowering: "look what I made!"
    5. Art is something is share: it builds connections to friends, family and community.
    6. Art teaches risk taking and learning from one's mistakes.
    7. Art teaches the use and care of tools, and builds relationship to the material world.
    8. Art develops hand and eye coordination and higher order thinking skills.
    9. art teaches open-ended thinking and creates an environment of questions rather than answers.  In art there are no right or wrong answers.
    10. Art teaches children that there can be more than more solution to the same problem.
    11. Art nurtures the human soul. 
    12. 33% of children are visual learners.
    13. Art develops focus and increases attention
    14. Art provides a common ground to reach across racial stereotypes, social barriers, and prejudices. An artist's palette has many different colors.
    15. Art steps out of the limitations of time and allows a child to be present in the moment.
    16. Art is Beautiful!
    17. Art opens the heart and mind to possibilities.
    18. Art is a way to see and understand the world around us.
    19. When art is integrated with other curriculum areas, children become more engaged in the learning process.
    20. Children can share and reflect on their art to learn about themselves, each other, and the world they live in.
    21. Art teaches one to explore playfully without a preconceived plan, learning from accidents, being surprised, getting beyond the fear of mistakes.
    22. Art awaken the imagination and allows the magic to flow.
    23. Art creates direct observational skills, learning to see the extraordinary in the ordinary, seeing things that otherwise would be missed.
    24. The earliest evidence we have of humanity is through sculptures, rock carvings, and cave paintings.
    25. Art develops instincts.
    26. A Van Gogh painting sold for $83 million dollars.

    Friday, October 14, 2011

    Resources for Inspiration and Lesson Planning

    Today's art educational resources are absolutely endless using tools such as the internet, libraries, and museums.  Below are some links that should give an art docent a great inspirational jump into the next class project...

    Kid Art Links:

    General Art Links:

    Museum Links:
    Prints Links:
    Check back again, we will update as we find more resources...

    Have an Artfully Beautiful Day!

    Friday, September 30, 2011

    Sunflower in Perspective Lesson


    Perspective in Art
    Medium: Water Colors

    Reason for the Lesson: This is a lesson about perspective.  Touching and feeling an object can help students develop a piece of art that represents their own perspective on the object.  This lesson uses water colors so the students will be able to explore the way in which water colors work.  Having them touch and feel the real sunflower allows them to see to see the texture which will help them to understand perspective when it comes to drawing their own sunflowers.

    Prep Time: 10 - 15 minutes, more if checking out books at library.
    Classroom Time: 1 Hour
    Materials: A REAL sunflower, various pictures of sunflowers from artists, Water color paper, water colors, sharpies, pencil, erasers,
    Preparation: Collect all materials. Check out books from library that feature sunflowers.  Find a LIVE sunflower for the kids to look at and touch!


    Instructions for Leading Lesson
    Discuss interesting facts about the Sunflower. Talk about height that a sunflower will grow; discuss number of seeds a flower will produce; Discuss that Native Americans used the seeds to make oil; show  sunflower artwork created by popular artists from the past.

    Discuss the shapes found in a sunflower;  circle for the inside, tear drop for the petals, hearts for the leaf, etc.  Discuss the varying color found in sunflowers and how all sunflowers are different from each other. Then we touched on texture and how the area in the middle of the flower has texture because of the seeds.  

    Give the class a chance to draw their own sunflower.   Start by drawing a large circle with pencil on the upper part of the paper.  Then draw a smaller circle on the inside that will become the inside of the flower.   Add the petals and talked about how to layer the petals to look like there are several layers. Draw stem and leaves. Instruct to outline pencil markings with the black sharpie.   Add water colors, use lightest color first, yellow then worked through orange to add additional color and dimension.  Add green for the stem and leaves then finally adding blue for the background.


    Credit: Art-A-Attack

    Friday, September 23, 2011

    Art Docent Tips

    FOR ALL GRADES
    • Check in with Office - Be sure to sign in and wear your name tag
    • Maximize Set-up Time - Consider scheduling sessions just after the kids get back from recess, PE, or library; this will allow extra time for set-up 
    • Walk into Class Completely Prepared - Pre-mix, pre-sort, pre-cut, pre-prep...be ready to go when you walk into class.  Your time is short and you don't want spend lesson time prepping.
    • Try the Project at Home - Gauge how long project will take at home.  Will it meet the time allotted?

    Thursday, September 22, 2011

    Defining the Elements of Art


    Color – The perceived wavelength of light reflected by an object.  Color has three properties: hue, value and intensity.

    Line - The path of a moving point, a mark made by a tool or instrument across a surface.  Lines can be straight curved or angular and lines can be thick, thin, light, dark, smooth, rough, solid or broken.

    Shape – objects that have two dimensions; length and heights. Shapes are made when lines connect and can be geometric, organic or free-form.

    Form – objects that have three dimensions; length, width, and depth. Forms are geometric organic or free-form.

    Texture – refers to how surfaces of objects look or feel.  Textures can be visual or tactile.

    Space- This is the area around below, above and within an object.  Positive space is the space occupied by shapes or forms in two or three dimensional artwork.  Negative space is the unoccupied or empty space over around, below and within shapes or forms in two or three dimensional artwork.


    Wednesday, September 21, 2011

    After the Lesson - Communicating

    Prepare the Lesson Description to hang with the art on the wall.  This is a great tool for teachers, students and parents to learn about the lesson.

    Complete the Lesson Brief then attach it to your Lesson Summary and place it in the Art-A-Baloo Crew (AABC) coordinator's box in the PTO office. Lesson briefs and lesson summary's can be emailed to the AABC Coordinator or Assistant Coordinator.

    The AABC Coordinator or Assistant will take a photo of the work in the gallery.    All the information will then be posted on this blog for all to see and share!

    Finally, after each lesson one or two pieces of art will be selected to display at Mead High Schools Annual EYE on Art Program. The student will be notified of this decision and we will help in celebrating this achievement.

    Tuesday, September 20, 2011

    Easy to Understand Line Exercise


    Line Art
    Medium: Black pens (sharpies)

    Reason For Lesson: To help the students understand that lines come in all forms (i.e., straight, wavey, hatching, circles, etc. and that you can create art using only lines.  This lesson can be taught at any grade level.  The lower the grade level use larger tip writing instruments.  The picture you see here represents a 4th grade lesson. 

    Prep Time: 10 minutes

    Classroom Time: 45 minutes to 1 hour

    Materials: 12x18 paper, black sharpie, scratch paper for practice

    Preparation: Very little.  Collect paper and sharpies. Decide what the students will be drawing and provide some ideas and samples of some options.  (i.e., turtles, sea lions, fish, etc.)

    Instructions for Teaching Class:   
    Open a discussion about lines.  Discuss that a line starts at one point and ends at another and it’s not always a straight line. Lines can be jagged, dashed, curvy, thin, bold, swirl and so on. Have the class warm up by making several of these line.   Given the students a sample of a picture with various types of lines.  With a 2x2 frame cut out (located in Art Supply room), have them isolate an area and draw the lines they see.  After the warm-up, give some samples of animal outlines and  ask the students to pick an animal to draw on their paper.  Instruct the students that the animal should to take up the entire area of the 12x18 paper.  Have the students divide the animal into 5-8 different areas.  Within each area instruct them to make different types of lines in each of the divided areas.  In addition to creating many different types of lines encourage them to make areas of dark and light.  
    This lesson can be adapted for upper grade levels.  Use a larger point sharpie and large paper (12x18)  for lower level grades (1st, 2nd and 3rd).  Use a finer point sharpie for the upper grades (4th, 5th and 6th) and a 81/2 x 11 paper.


    Credit: Part of this lesson were adapted from the Art Attack Program


    A Snowman in Perspective


    Perspective in Art
    Medium: Tempura Paint

    Reason for the Lesson:  This lesson discusses that although we see objects in their entirety what if we could only see 'part' of the object or we're looking at the object close up.  What form would our art take if we could only see part of the object?

    Prep Time: 15 minutes

    Classroom Time: 50 minutes

    Materials: Blue construction paper, pencil, sharpie, red, green, white, black, orange tempura paints.

    Preparations: collect materials. Do some research on perspective in art.

    Instructions for Leading Lesson
    Start lesson with a discussion about PERSPECTIVE in art. Ask a student to define perspective. Definition:  'looking at a subject from a different angle or direction'

    Using the subject of a snowman, most students (even adults) want to draw the three circles of their snowman and get on with it.  Talk about taking a close up look at a snowman.  Ask the questions: what do you see if your snowman in directly in front of you?  We may not see the bottom part of the snowman but his face would appear very large. How big would his nose be? Would you see his entire body or just part of it?

    After discussion, instruct the students to draw the body shape, from the mid-part of the middle circle to the head.  Depending on grade level...show them step-by-step show how to draw the hat, scarf, nose, eyes and buttons.  Pass out tempura paint and shown how to property use the paint brush and other tools to create their ‘close-up’ perspective of the snowman.

    The children were quite impressed with their new found knowledge on perspective.  The artwork you see here is a result of this lesson!

    Credit: Deep Space Sparkle


    Name in the Color


    Color Wheel
    Medium: Oil Pastel and Water Color

    Reason for Lesson: To introduce students to the concept of the color wheel.  This lesson discussed primary and secondary colors.

    Prep Time: 15-30 minutes for materials.  May take a little longer to learn and formulate lesson to deliver the color wheel concepts.

    Classroom Time: 1 Hour

    Materials: Color Wheel to show in class,

    Preparation: 'Brush up' on Color Theory! Create a 'sample' to show the students. 

    Instructions for Leading the Lesson
    Introduce, in a simple format, the concept of the Color Wheel/Color Theory. Discuss that artists can make use of the Color Wheel to develop their artwork.  

    Show  a color wheel that consisted of 12 colors.  Yellow at the top, then clock wise; Yellow-orange, Red-orange, Red, Red-violet, Violet, Blue-violet, Blue, Blue-green, Green, and Yellow-green.  We refer to a few of them by more common names, like Purple (for Blue –violet), Turquoise (Blue-green), or Magenta (which is pretty close to red-violet).  Other names like Light or Dark Orange, or even Chartruese (for Yellow-green, are sometimes used by artists as well).

    Discuss PRIMARY COLORS  which are the most important colors in the wheel. The only colors are RED, BLUE and YELLOW.  If you’re a painter, you can get any other color you need just by mixing red, blue and yellow paint. 

    The PRIMARY COLORS are known as power colors---blue and red are known specifically as power colors (think cars), and yellow is the brightest color on the whole color wheel. 

    Show the students that when you mix any two of the primary colors together and you’ll get one of the next three hues: the SECONDARY COLORS . Green, Orange, and Violet fall in between red, blue and yellow, and each one serves as COMPLEMENTARY COLORS to one of the primary colors.
     
    COMPLEMENTARY COLORS, when put together, appear brighter or more vivid than when apart.  Each color is enhanced by the closeness of its ‘opposite’.


    Characters from the Game of Clue in Color

    *Need Art*


    Clue Characters and Monocromatic Color
    Medium: Tempura Paint

    Reason for the Lesson: This is an opportunity to discuss the concept of monochromatic art.  Which is creating art using one color!  By adding either white or black the color values can be changed.  This is a great lesson to use after the color wheel has been introduced.

    Prep Time: 15 minutes
    Classroom Time: 1 1/2 to 2 hours (can break down into two sessions)
    Materials: Clue character game pieces, 11x14 paper, tempura paints in colors of the clue characters and white and black, pencils, fine sharpies,
    Preparation: Collect materials. Prepare to discuss monochromatic colors. Investigate how to draw cartoon characters.


    Instructions for Leading this Lesson:
    Explain to the class that they’ll be drawing cartoon characters from the game ‘Clue’, choosing one of the six characters; Colonel Mustard, Mrs. Peacock, Mr. Green, Ms. White and Miss Scarlet and Professor Plum.   Then using paint, explain they'll be creating a monochromatic painting of each of their characters. 

    Step one, instruct the class how to draw their cartoon characters.  Offer a warm up exercise on how to draw cartoon people draw people and facial expressions.

    Step two, discuss how to create lighter and darker shades of one color.  Demonstrate in front of the class how to make a color lighter by adding white.  Then demonstrate how to make it darker by adding very, very, very little black.

    Then it was the classes turn to begin creating their CLUE characters.  They each selected their character then began drawing.  After that, the fun began with the mixing of colors!  Each student was given their color (for their character) AND white and black paint.  They mixed and mixed until they created the shades they wanted to use.  Then the painting began!

    What you see here is a result of this art lesson!

    Credit: Art Attack Program


    Creating Art Using Your 5 Senses

    *Need picture*


    Shape and Texture
    Medium: Water Color

    Reason for Lesson: Not all art is created by using our eyes.  Art is created by using our other senses too!  What if we couldn't see?  Could we create a piece of art by using ONLY our ability to touch with our fingers, smell with our nose or hear with our ears?  Could we create art by using only these three senses? Could we create art by using only one of these senses?   

    Prep Time: 10 minutes

    Classroom Time: 1 Hour

    Materials: two bags filled with3-4 items to touch, something to smell, music, music player, 81/2 x 11 paper, pencil, colored pencils.

    Instructions to Lead Lesson: Discuss the idea of creating art using our senses.  Discuss how most ART is created using our sense of SIGHT. Explain how we will be creating art using ONLY SMELL, TOUCH and HEARING. 

    You could use the idea of the Ocean or any other idea...BUT don't tell the class you are using the ocean .  They MUST conclude this after they have a chance to experience all the senses.    Bring in a SMELL- use a candle that smells like the ocean, or an air fresher that smells like the ocean. TOUCH:  Fill a bag with items you'd find at the ocean, i.e sea shell, sand, piece of a towel, etc. BUT don't let them look in the bag!  HEARING: Play music that sounds like the ocean. 

    For a little bit a fun you could blind fold each student with a strip of fabric!   This would force them to really use their senses.  OR you could turn off the lights during the sensing part!

    Other sensing IDEAS: Baking Cookies, Fall (leaves, flowers, etc), etc.

    Credit: Art Attack


    Split Portrait in Balance


    Split Portrait - Asymmetrical
    Medium: Color Pencils

    Reason for Lesson: This is a perfect lesson for upper grades where using a ruler has already been taught.  Students must understand smaller measurements and how to find equal distance to another point. This is a great lesson if you want to briefly introduce advertising and it's basic concepts. More importantly it's about creating balance from one side of the art to the other side.

    Prep Time: 45 minutes to 1 hour

    Classroom Time: 1 1/2 hour

    Materials: Colored Pencils, pencil, 8 1/2  x 11 paper, ruler, scratch paper, 1/2 of a print advertisement mounted on while drawing paper.

    Preparation: This is partially a lesson on advertising and partially a lesson on measurements using a ruler.  Brush up on using a ruler and finding smaller measurements i.e., 1/4, 1/8 and 1/16 of an inch.    Finding the ads in magazines is the time consuming part of this project.  However, if you make the effort the kids will have fun!  Be sure that the ads are easy to replicate.  Look for straight lines and repetitive features of the ad. Mount half of the ad on a piece of drawing paper. The kids can be instructed in class to 'frame' the right side of the ad.  

    Instructions: Discuss advertising and the various ways to advertise.  Touch of radio (air), television, billboards, Internet and print. Show them an example of the art they will be working on.  Explain to the class that they will be replicating the right side of the advertisement. 


    1. Instruct students to draw a boarder/frame for the right side of the ad with a pencil.  Using their ruler have them measure where that frame should end and complete the frame.
    2. Give each student the right side of the 'cut' ad.  Instruct them to use their colored pencils  to measure distance from the center of the page to the beginning or end of the object in the ad. 
    3. Encourage them to be precise as they measure which will them help them recreate the ad so it looks almost identical to the whole ad.  
    4. Students will be tempted to 'trace' the right side.  This defeats the purpose of the lesson. 
    5. This lesson goes outside the philosophy of art and that there is no right or wrong way to create a piece of art.  This lesson is more about precision and creating and 'exact' replica of art.

    Credit: Created by PV Art Docent in 2010


    Archeology Finds in Art using Space


    Personal Archeology Water Resist
    Medium: Oil Pastel and Watercolor

    Reason for Lesson: Lesson in watercolors AND a chance for the students to think about their personal intrests, things they've collected, sports they play, etc.

    Prep Time: 10-15 minutes

    Materials: Oil Pastels, water colors, water containers (for desks), sharpies

    Classroom Time: 1 1/2 hours.  This lesson could be broken down into two parts on two days.

    Instructions to Lead Lesson:  Have the students share what they know about Archaeology. Ask the students, "If someone went on an Archaeological dig in your back yard 1000 years from today, what would Archeologist find in their backyard that would tell them about you."  Brainstorm with the class ideas of things that they could bury in their backyard to tell future civilizations about themselves. 

    Then have them create a drawing using pencils, sharpies, and oil pastels that showed their important items buried underground. After they draw and color their items with oil pastels have them paint over the entire image with watercolor paint. The watercolor paint resisted the oil pastels and gave the image the look and feel of being underground.


    Credit:  Deep Space Sparkle


    Falling for Foreshortening


    Falling for Foreshortening
    Medium: Colored Pencils
    Reason for Lesson: To discuss the concept of forshortening and how space and size affects the distance of the object.   Objects closest to us appear bigger and those objects that are further from us are smaller.


    Prep Time: 10-20 minutes

    Classroom Time Needed: 1 1/2 hours

    Materials: 12 x 14 White Paper, pencil, eraser, black sharpie, colored pencils, a pair of shoes
    Preparation: Research facts on foreshortening, gather visual examples from books of foreshortening,  gather 12x14 white paper and other supplies needed. 

    Instructions to Lead the Lesson:
    Discuss concept of foreshortening, show pictures of examples you've gathered. Instruct students to take off their shoes.  They will trace their shoes and hands using a pencil.  Then they will draw their body using the concept of foreshortening.  Turning over their shoe they can complete the soles of their shoes and hands and finish by using colored pencils to add color.

    Credit:Deep Space Sparkle


    Possible Approaches in Presenting the Reproductions

     
    • Write the name of the artist and painting on the board.  Help the children with the pronunciations. You may wish to sometimes have them give the title ideas of their own and then give them the title after the discussion.
    • Ask what feeling the colors convey…pleasure, joy, sadness, anger, noise, etc.  And why.
    • Relate painting to the senses: rough, smooth, sharp, cold, hot, loud, etc.
    • Using the sensual as well as the emotional and intellectual response to things in the painting, relate to their everyday feelings about themselves and people and environment.
    • Don’t forget rhythm, color movement, line movement.
    • Point out that an idea or feeling is the beginning of the artist’s creation; the artist then develops this idea or felling through the different medias and processes of art.
    • Do not overlook the technical aspects of creating a work of art, the media, materials, techniques.  Children want to know ‘how’ things are done.
    • Relate the painting to history.
    • Relate the painting to characteristics of the particular period in art.
    • Discuss the artist’s background and habits, etc.
    • If a picture has obvious narrative or dramatic content, discuss this first as it will be most important to the children…but never stop the discussion with more verbal storytelling.  Make it visual.
    • In discussing abstract works, you may find helpful the idea of looking for ‘expressive personality: i.e., the idea that paintings, like people, have personalities.
    • Do not use questions that are too vague and open; for example, “what do you think of this picture? Is of no help.  Instead, having been told by a child that a particular painting gives them a spooky feeling, a good follow-up might be to ask the group to find all the various factors which create the spookiness.
    • Use music or poetry to set a mood that corresponds to your picture.
    • Help the children find colors, lines, or shapes that are repeated.
    • Always try to bring in a real object that is shown in the picture.  A scarf, hat, lantern, raincoat, bowl, candle, letter, piece of fruit, etc., will often be a great way to introduce a picture.  “The artist for this month has one of these in his/her picture…”
    • Sometimes our eyes complete lines that are left unfinished by the artist…give the children an opportunity to ‘find’ these imaginary lines.  Ask them to come forward and show the class.
    • Artist use many different kinds of brush strokes to ‘fill in’ area of color.  Help them to see lines that are hurried, detailed, thick, wavy, wide, tiny, precise, etc.
    • Challenge the children to continuously look and find new information.
    Resource:  Northshore School District