Saturday, October 31, 2015

Matisse Flower Vases


Title of Lesson:  Matisse Flower Vases
Medium:  Paper collage and sharpie
Reason for Lesson:  Learn about the artwork of Henri Matisse and the principle of patterns and color.
Label:  Color, movement, harmony, Matisse, Flower, Collage, 5th grade

Prep Time:  20 miutes

Preparation prior to lesson:  gather supplies, cut tissue paper into 2x2 inch squares

Class Time:  1 hour
Materials: White Background paper. Many different colors of construction paper. Markers, Sharpies, Glue, 2x2 inch square colored tissue paper

Instructions to Lead Lesson:  

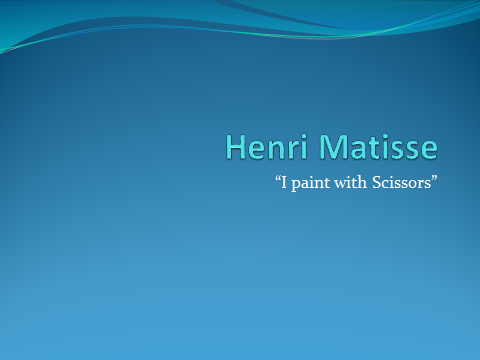
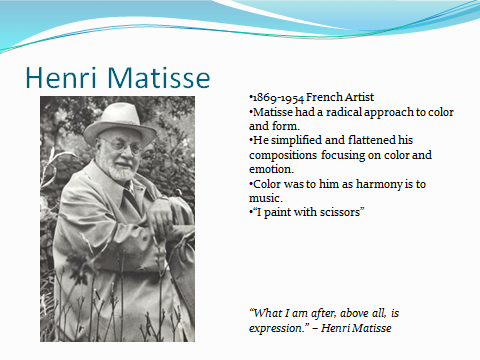
Introduce Henri Matisse. Give a brief bio and try to relate his life in some way to the kids (keep this lesson time brief, take no more than 5-10 minutes for the Artist lesson)

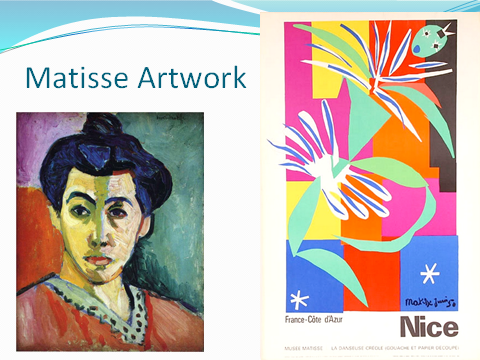
  • Show examples of Henri Matisse’s artwork and have the students discuss what makes Matisse’s artwork unique. Talk about what the artist is trying to convey with his art. What feelings are evoked?
  • Have the students discover different repeating patterns in Matisse’s artwork. Have them look for all the different variations of pattern. What colors, themes, medium does he use? What feeling  does the repeating pattern create in the artwork? Be sure to point out that Matisse “Painted with Scissors”. He used collage and patterned paper in much of his later artwork.
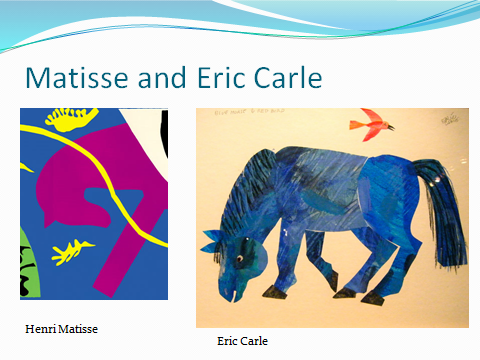
  • Point out that Eric Carle (The Very Hungry Caterpillar) was influenced by Matisse. You may wish to show some of Eric Carle’s books to show how he was influenced.

In 5th grade for the month of January the students are learning about the Renaissance. Use this art lesson to highlight how art is influenced and evolves over time.
  • Art prior to the Renaissance (the 1200’s) was flat and lacked perspective or realism. The subjects were not drawn in believable or realistic settings. Show Cimabue, Madona Enthroned
  • Most artwork was of a religious theme prior to the Renaissance
  • The Renaissance was a time of artistic change. Leonardo Davinci influenced how artists created during the Renaissance. He started adding more realism and made the subjects more lifelike. He also added more believable settings and included nature in his artwork. Show Leonardo, Madonna on the Rocks, 1483)
  • What differences do you see in these two pieces? What similarities?

  • Fast forward to Henri Matisse (1900’s). Show pictures of Henri Matisse. How is his artwork the same or different from the Renaissance artwork. What elements are the same and what has changed?
  • Art is still changing. Eric Carle (1929) was influenced by Matisse.  How do you take what you like from your friends and make it your own?


  • Create the patterned vase on a collage background artwork
matisse vase.jpg

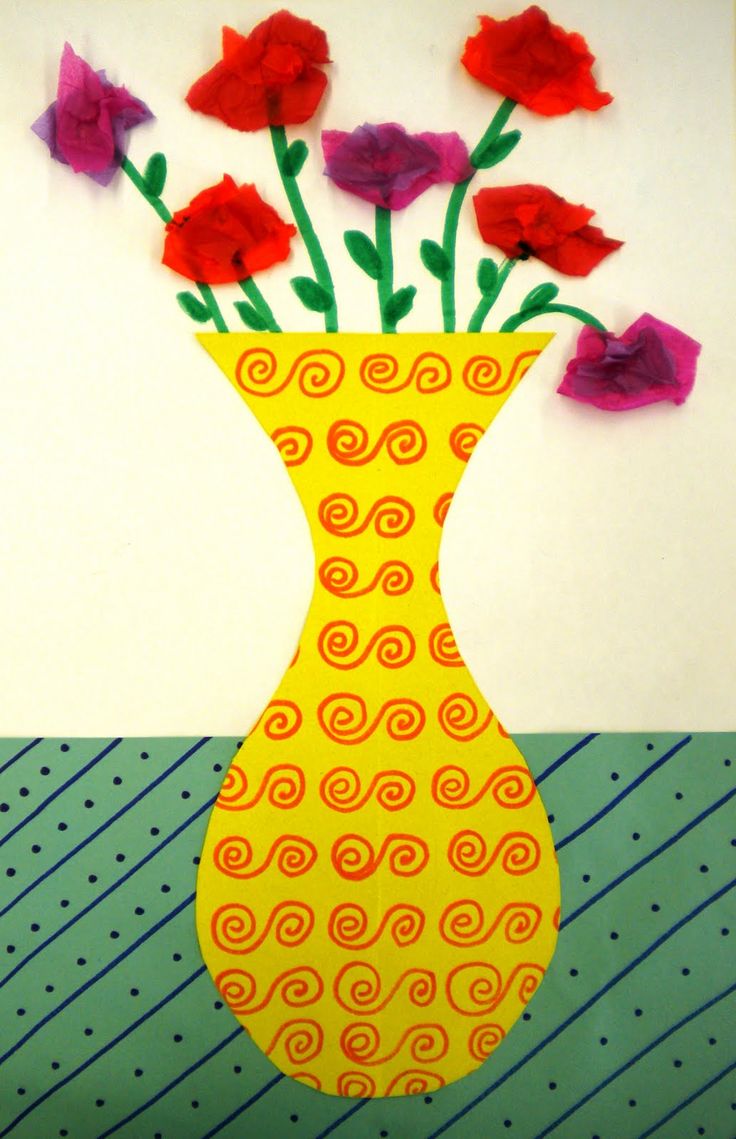
  • Begin with Vertical 12x18 in white watercolor paper and 5 sheets of various sizes of colored construction paper and 1 8x10 piece of colored construction paper
  • Cut large blocks out of the colorful construction paper students may wish to cut some wavy lines for edges (keep it simple for time)
  • Choose two color blocks and draw a repeating pattern with sharpie (time permitting. To finish in an hour this step may need to be omitted)
  • Clue colored blocks to cover the entire white paper background.
  • Take a 8x10 solid piece of colored construction paper and with the sharpie draw a repeating pattern to fill the entire page.
  • Fold patterned paper in half (vertical) with pattern on the inside.
  • Draw and S shape on the fold. Be sure to draw the lines from top to bottom staring from the top right corner and finishing at the bottom of the page.
  • Cut along the lines and open up to form a vase.
  • Glue the vase onto the background aligning bottom edges
  • Place Elmers glue drops on the background several inches above the vase at various heights
  • Glue down 5-7 pieces of tissue paper. Wait until dry and then crinkle.
  • Add stems with construction paper if desired.

Credit:  artwork influenced by http://artiswhatiteach.blogspot.com/2010/04/2nd-grade-matisse-flower-vases.html?m=1


Op Art Waves

Lesson: Op Art- Waves with Bridget Riley

Reason For Lesson: To teach the concept of Op Art, pattern, color and shading

Supplies: Watercolor paper, thin black sharpies, colored pencils

Length of Lesson: 1 hour


Owl Line Art With Patterns

Lesson: Line Art with Gustave Dore

Reason for Lesson: This lesson explores the artwork of Gustave Dore and the concept of line art and patterns.

Medium: Pen and Ink
Supplies: Watercolor Paper and black sharpies

Project time: 1 hour


Grandma Moses "Winter In Vermont"

October 28, 2015

Grandma Moses "Winter in Vermont" - 5th Grade Art

IMG_7741.JPG

Artwork shown above is by Alicia Frank taken from a Grandma Moses, “Winter in Vermont”
Grandma Moses     ...Winter:
Grandma Moses, “Winter in Vermont”

Medium: Tempera paint and colored pencils

Reason for the lesson:  Element of Art is perspective.  To study the works of art from artist Grandma Moses and to use her style to paint a landscape picture.  This art uses layers of paint to add bold colors to paper.  This art is set in a colonial style small town in Vermont during winter.  5th grade teachers would like us to talk about colonial towns and the kind of stores, churches, buildings that were available in colonial towns.  We will label some of the building in our art. (Shoe Shop, Blacksmith, Market, Herbal Store, General Store, Doctor, Church, Pots and Pans)

Label:  5th grade, Grandma Moses, Tempera Paint, Landscape, Winter

Prep Time: 30 minutes

Prep Prior to Class:  Gather 5th grade box from the art closet.  Fill cups of water for rinsing.  Pick out art from Grandma Moses to display by document camera or library books provided in the box.  See this blog:  The art is different but the concepts are similar.  http://www.artforsmallhands.com/2013/02/in-style-of-grandma-moses.html?m=1

Class Time: 1 hour session and ½ hour session
Materials: 8 ½ x 11 white paper, pencils, colored pencils, water cups, paint cups, large and small paint brush, and paper towels.  The students should have pencils and colored pencils at their desk.  Provide large scratch piece of colored paper to protect desk and tap off excess paint.

Instructions to Lead Lesson:

Step 1:  Talk briefly about the life of Grandma Moses.  See this blog:

Discuss the main characteristics of Grandma Moses’ works: she painted from her memories; she divided her paper, painting the sky first, then the hills, then the cattle, and then the buildings and people; her paintings are cheerful and full of bright, pure colors; she used no shadows; and she showed perspective, or distance, by painting objects larger in the foreground (closest to the viewer) and smaller in the background (farthest from the viewer).

Describing her process, she said, “I paint from the top down. First the sky, then the mountains, then the hills, then the trees, then the houses, then the cattle, and then the people.” Her tiny figures cast no shadows and seem arrested in action. Her use of color relates to the seasons, such as white paint for winter scenes, light green for spring, deep green for summer, and brown for autumn. Working from her memories, she portrayed the way of life that she had once lived. She painted over 1,000 paintings, twenty-five of which she did after her 100th birthday.

We want to paint a “winter scene” as Grandma Moses would.  Begin by sketching the line of the sky, mountains and hills with pencil.  Then mix blue and white to create an icy blue...darker for the sky and lighter for the shading on the top of the hills.  Paint the sky first as Grandma Moses would then move to the hills.  Paint the road brown mixed with a little yellow.  When mixing colors take a dab of the two colors and lightly mix to make the new color so that you still see a variation of the two colors not a solid color.

While painting today remember to keep your brush dry and not to water down the paint.

The “snow” white isn’t painted. The paper is white.
IMG_7732.JPG

IMG_7736.JPG
Step 2:  
Next think about what type of colonial houses you would like to add to your painting.  For example, a Shoe Shop, Blacksmith, Market, Herbal Store, General Store, Doctor, Church, Pots and Pans shop.  You may sketch out your buildings along the road with a pencil.  Paint each simple building shape.


Step 3: Using a very dry brush gently tap your small brush in the black paint.  Tap some of the paint off on the scratch piece of paper.  Tap a thicker trunk of the tree.  Then gently tap branches to the side of the truck to create branches of a tree.  Gently tap bushes as well.
IMG_7737.JPG


Step 4:  Add roofs to houses with ice cold blue or grey, windows and doors to houses in black paint with a small brush.  Add a fence in black.  Add snow details with ice cold blue with a medium brush with a small amount of paint.  The paint brush will be very dry.  Add drops of snow throughout the entire landscape and on top of the building and trees.
IMG_7738.JPG


Step 5:
When project paint is dry, add details in colored pencils such as people, cars, wagon and horse, policeman, signs to name a few of the buildings throughout the town.

IMG_7742.JPG


Thursday, October 15, 2015

Docent: Sandi Lyman
Grade: 6th
Date: October 2015

Medium:  Natural fibers and elements of nature

Reason for Lesson:  This lesson was designed to explore the medium of natural weaving using the Tabby weaving method. This was an opportunity for students to experiment with a different art medium

Lessons should include one of the Elements of Art: The element of art highlighted in this lesson is texture, color, form, and pattern

Label:  texture, color, form, and pattern

Prep Time: 3 hours

Preparation prior to lesson:  Gather smalls sticks (4 per student) cut sticks to equal lengths. Cut paper, feathers, fabric, leaves to equal lengths to weave through the loom

Class Time:  Class instruction time was 1 hour. If the students did not finish it was an easy project for them to finish on their own during free time.

Materials:  Sticks, twine, fabric, feathers, patterned paper, yarn, pipe cleaners, ribbon


1. Pick four sticks that for the most part, same size and length. 


2. Using a short piece of twine, tie two sticks together at the corner, repeat at each corner. Making sure they are tight and pressing the loom flat on this table in between each tie

3. To make the Warp, use a long piece of twine and and tie it to the top part of the loom.

Take the twine down to the bottom part of the loom and wrap it around the stick. This will keep the twine tight as you go up and down with the twine making the entire Warp. 
This is very important to insure having a nice tight Warp.


4. After repeating the wrapping, tie it off onto the stick.

5. Now you are ready to weave! Pick out about 13-15 pieces to weave. 
We will be using the Tabby method of weaving. As shown here:


If your piece that you're weaving is long enough turn and go back through. Using the "tabby" method. Going "over - under" and the next run "under - over" Let the ends just hang off the sides. We will trim them at the end.


6. Using half of a Popsicle stick, you can tape the piece you are weaving and guide it through the warp a lot easier. Use a plastic fork to carefully push the piece up toward the top of the loom. This will prevent any big gaps


Repeat the steps of weaving until you have filled your loom. If you have any long prices hanging off the sides, trim with scissors. 
Here are some amazing examples of nature weaving: